Wednesday, January 29, 2014
Ports
. VGA Cable
Also known as D-sub cable, analog video cable
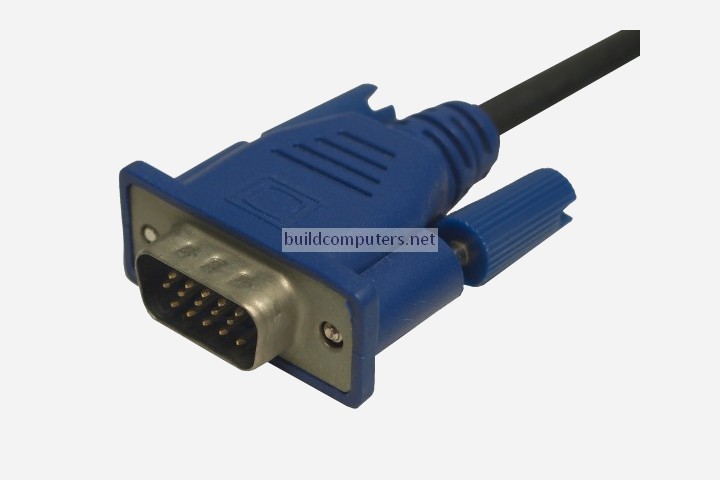
Connect one end to: computer monitor, television (PC input port)
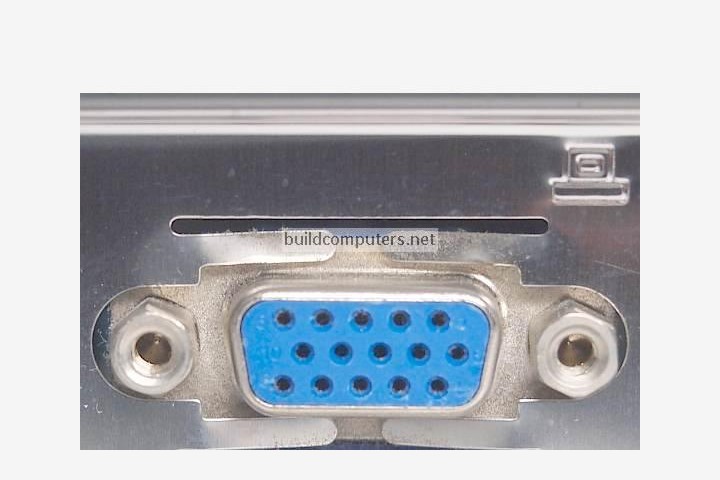
Connect other end to: VGA port on computer (see image below)
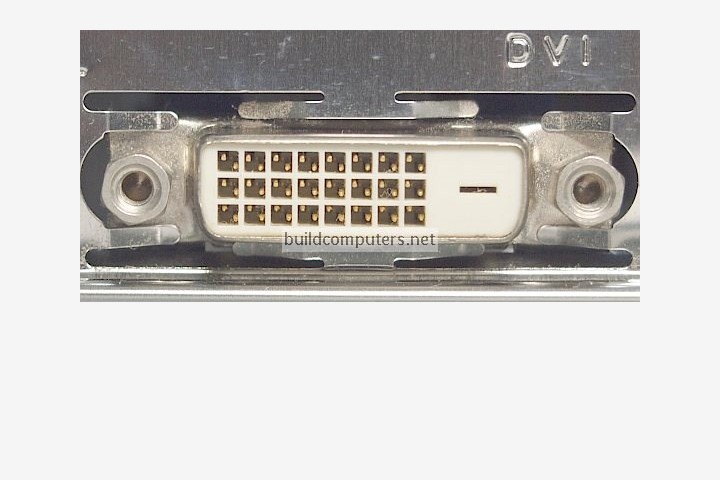
2. DVI Cable
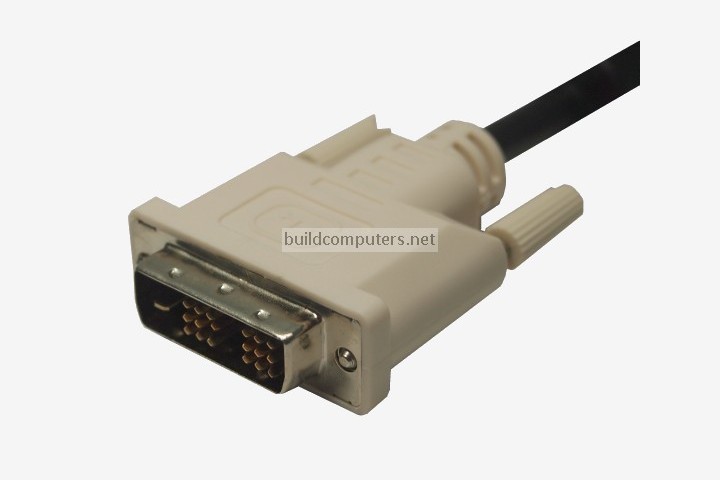
Connect one end to: computer monitor
Connect other end to: DVI port on computer (see image below)
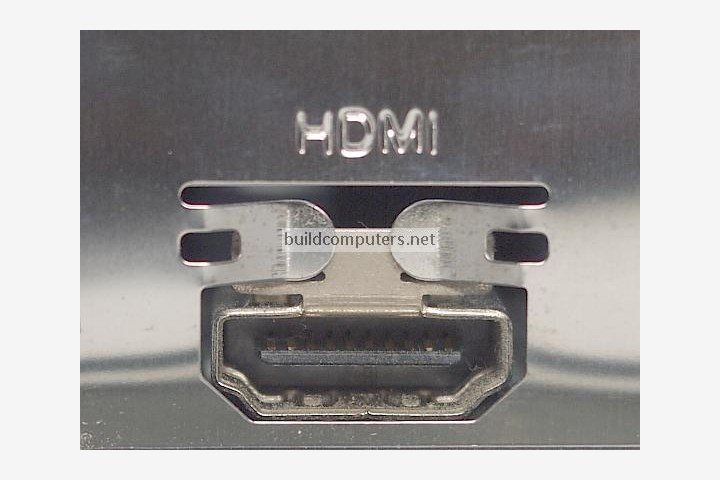
3. HDMI Cable
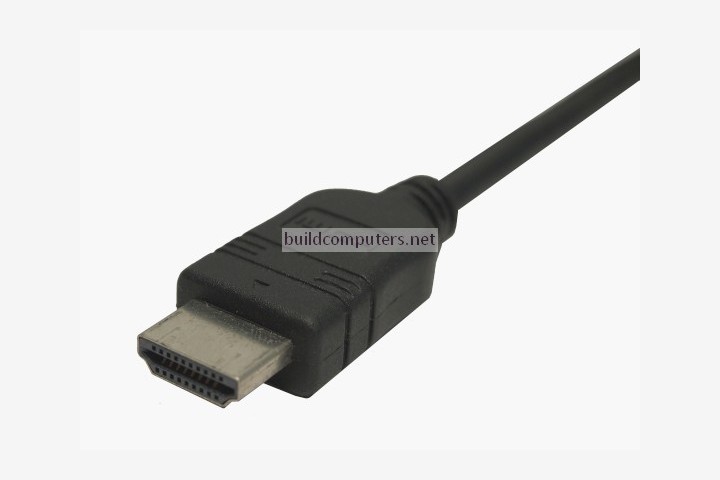
Connect one end to: computer monitor, television
Connect other end to: HDMI port on computer (see image below)
Note: If you're hooking up a television to your computer, then we would recommend that you use a HDMI cable as your PC cable connection since it is able to transmit both display and sound - So you can not only use your TV screen as a monitor, but also make use of your TV speakers to play PC audio.
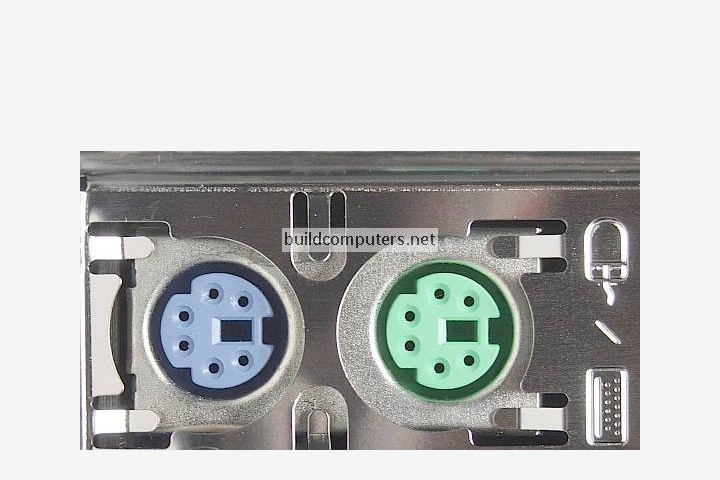
4. PS/2 Cable
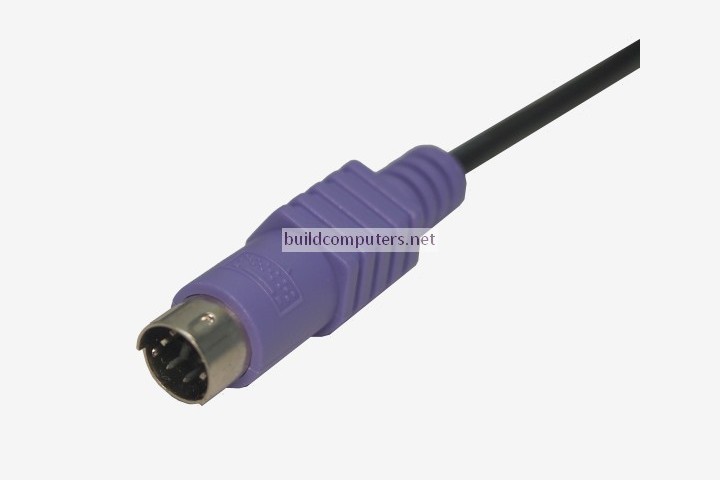
Connect one end to: PS/2 keyboard, PS/2 mouse
Connect other end to: PS/2 ports on computer (see image below)
- Purple PS/2 port: keyboard
- Green PS/2 port: mouse
5. Ethernet Cable
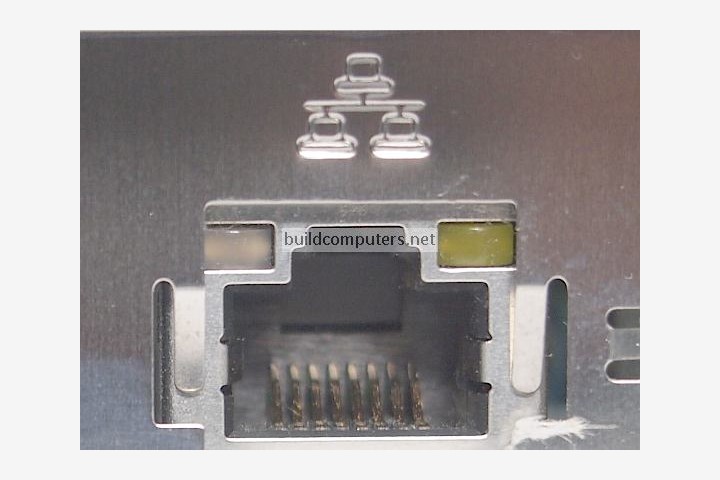
Also known as RJ-45 cable
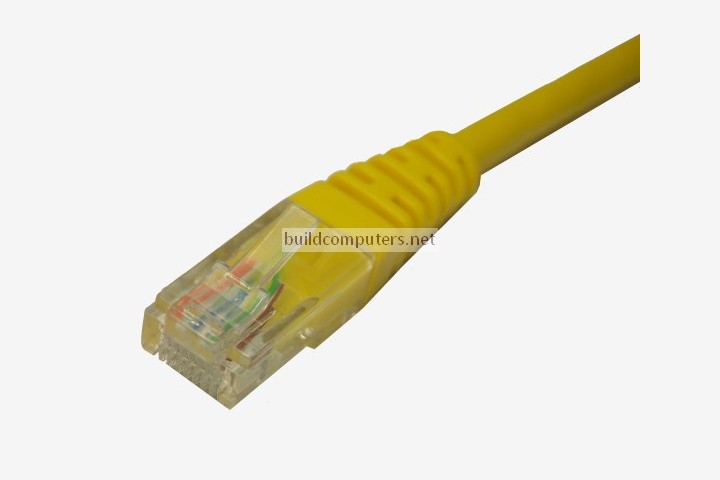
Connect one end to: router, network switch
Connect other end to: Ethernet port on computer (see image below)
6. 3.5mm Audio Cable
Also known as phone connector (since 3.5mm jacks are often found on mobile phones too)
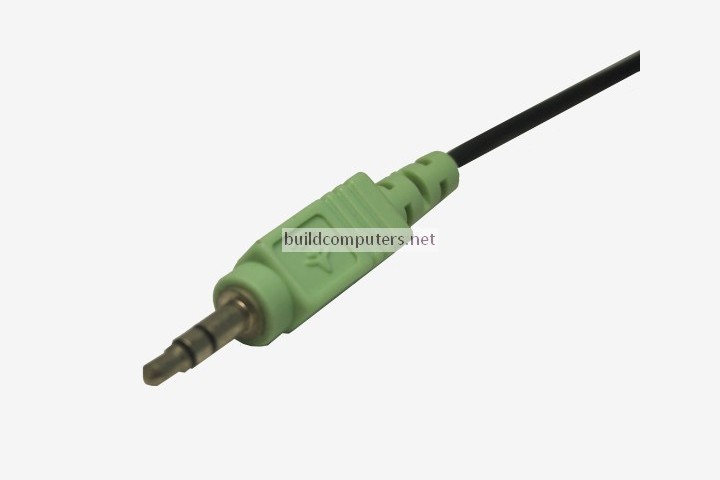
Connect one end to: computer speakers, 3.5mm headphones, 3.5mm microphone
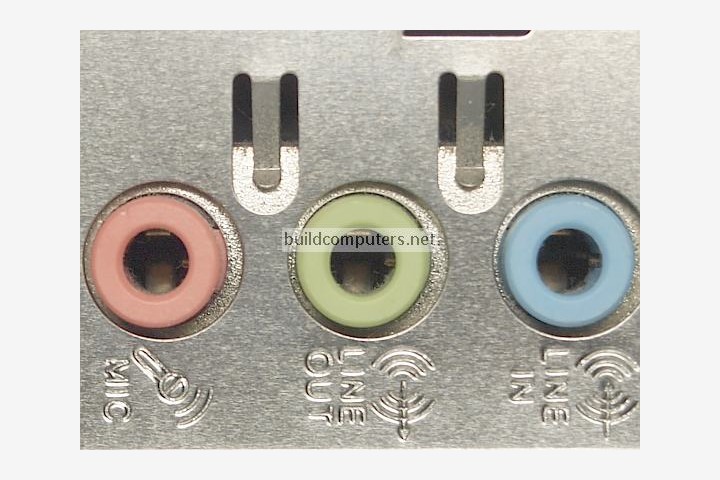
Connect other end to: audio ports on computer (see image below)
- Green audio port: computer speakers or headphones
- Pink audio port: microphone
- Blue audio port: MP3 player, CD player, DVD player, turntable, electric guitar etc (line-in port to play and record sounds from the above devices)
7. USB Cable
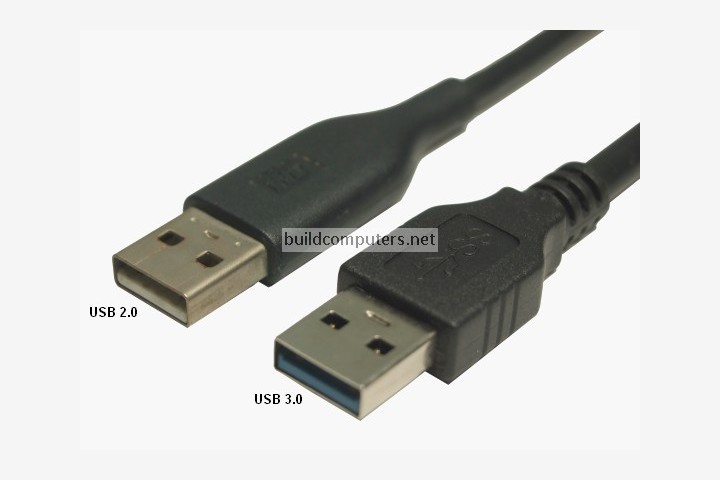
For USB computer cable connections, there are 2 formats that are in popular use: USB 2.0 and the newer USB 3.0
How to tell USB 2.0 and 3.0 cables apart: USB 3.0 cables have a blue tip, and sometimes you can find a SS "Super Speed" label on it. See image below:
Since USB was intended to be the one computer cable connection to replace them all, it's no surprise that the possible uses for a USB port are quite mind-blowing. For this computer cable guide, we have listed its more common uses below:
Connect one end to: USB device
- Storage devices: USB flash drive, external hard drive, external optical drive
- Input devices: USB keyboard (wired and wireless), USB mouse (wired and wireless), webcam, scanner, gamepad
- Output devices: printer, all-in-one office machine, USB speaker
- Wireless adapters: network (Wi-Fi) adapter, bluetooth adapter, 3G adapter
- Data (and charging) cable for mobile devices such as mobile phone, tablet, MP3 player
Connect other end to: USB ports on computer (see image below)
How to tell USB 2.0 and 3.0 ports apart: USB 2.0 ports have black tips while USB 3.0 ports come with blue tips. See image below:
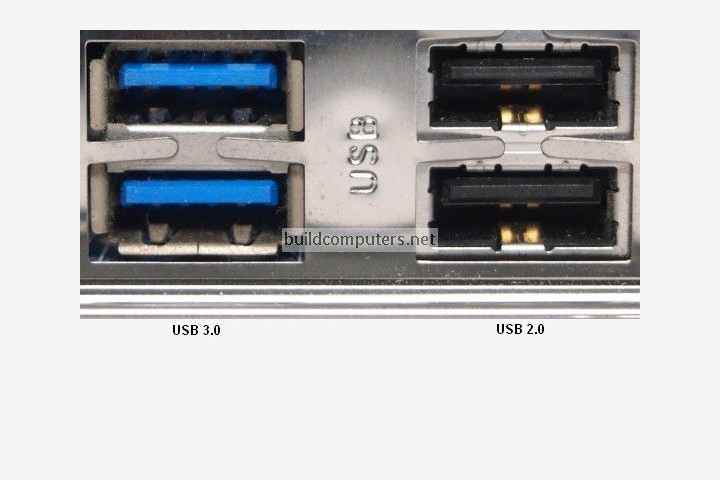
USB 3.0 is backwards-compatible... meaning that you can connect a USB 2.0 device to a USB 3.0 port and vice versa (but the USB 3.0 devices hooked up to a USB 2.0 port will perform at lowered rates).
8. Computer Power Cord
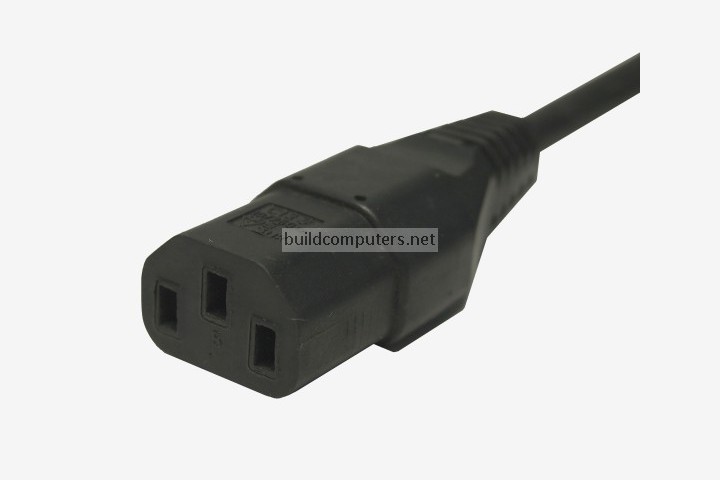
Connect one end to: AC power socket
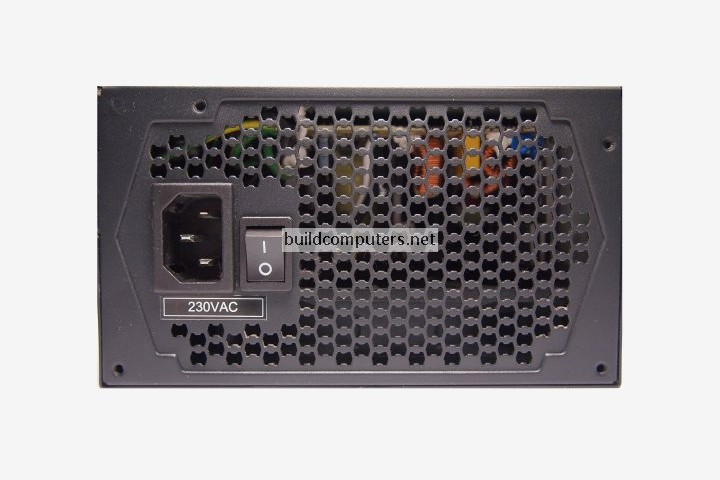
Connect other end to: power supply unit (see image below), computer monitor
Note: Always turn off your power supply unit (with the 1-0 switch at the back) before connecting a power cord to it.
Keyboard
his article seeks to explain the different types of computer keyboards such as gaming keyboards, laptop keyboards, ergonomic keyboards, thumbsize keyboards, numeric keyboards and others.
There are also other types of computer keyboards, such as foldable keyboards, laser/infrared keyboards and chorded keyboards. Keyboards also connect with different ports such as PS/2, USB and others.
Laptop Keyboards
The laptop computer keyboard is a small version of the typical QWERTY keyboard. A typical laptop has the same keyboard type as a normal keyboard, except for the fact that most laptop keyboards condense the symbols into fewer buttons to accomodate less space.
There are also often extra keys such as power buttons, volume buttons, play buttons, rewind buttons, mute buttons and others.

Gaming Keyboards
Gaming keyboards are similar to normal keyboards except they generally contain extra features such as illuminated keys, multimedia keys, an additional LCD screen, palm rest and other features.
Illuminated keyboards are useful for playing games, during the night, when it's too dark to see the keyboard normally. The multimedia keys are also useful for adjusting the volume, for changing the music tracks and for doing other things, while continually playing your game.
Ergonomic Computer Keyboards

Ergonomic computer keyboards is a computer keyboard designed with ergonomic considerations to minimize muscle strain and a host of related problems.
An ergomic keyboard is designed to make typing easier and lessen the strain that your hands may suffer, such as "Carpal Tunnel Syndrome".
I recently bought an ergonomic keyboard, the same design as the one on the right and it has decreased the strain and improved my typing skill and speed. I highly recommend that you look at buying an ergonomic keyboard.
Laser / Infrared Keyboards
The laser keyboard is a recent gadget to the computing world. This device projects the keyboard on to a flat surface, such as a table or desk. This then allows you to type directly onto the table. However, this invention still needs to be improved and can be frustrating to use at the moment.
Rollup Keyboards
Rollup computer keyboards are extremely good for travelling. Simply roll them up and then unroll them when you need them again.
Typically the material is either silicone or polyurethane. These devices are meant to be rolled up, rather than folded, as folding can damage the circuitry.
I think these can be cool as a gadget, or for someone that is moving around a lot, but for the typical user is probably not a necessity.
Other Types of Computer Keyboards
Well the variety of computer keyboards can go on and on. There are so many different types. There are also thumbsize keyboards, numeric keyboards, Apple keyboards and others. I am not going to go into all of them here.
Personally I would either recommend the ergonomic keyboard (especially if you plan on using it a lot) or just a typical normal keyboard.
Computer Keyboard Connections
Another way you can split up the types of computer keyboards is via the connection method, between the keyboard and the computer.
Typically computer keyboards were connected to the computer via the PS/2 port, USB port or through a wireless connection. For a long time the PS/2 port was the only connection that the keyboard had, however the USB connection and the wireless connection are fast becoming the most popular.
Conclusion
So I hope that through this article you can learn about the different types of computer keyboards. There is such a wide variety and the idea of choosing a certain type can be daunting.
Personally I recommend that you don't buy the cheapest keyboard you can find. Remember that you will be using this computer keyboard a lot and that it is an important part of your computer setup. It is a good idea to find a keyboard that will be comfortable and suit you.
Mouse
Different Types of Computer Mice
23MAR
The computer mouse functions by detecting the two dimensional motion relative to the surface it is kept on. It is the motion of the mouse that converts into the motion of the cursor on the screen of the PC or laptop.
Over the years, we have seen dramatic evolution in the technological arena. Various types of mice are available in market and the selection solely depends on your requirement. Let’s take a quick look at the available options:
Mechanical Mouse
Also called as the ball mouse, a mechanical mouse has rubber or metal ball on it’s underside. When the ball rolls, mechanical sensors inside the mouse detect the direction and move the pointer on the screen of the PC. This type of mouse requires a flat surface or a mouse pad to work efficiently. One of the drawbacks of the device is that it is more prone to attracting dust.
Optomechanical or Optical-mechanical Mouse
An Optomechanical or optical-mechanical mouse is same as the mechanical mouse except that the sensors used in it are optical and not mechanical. The device is a combination of optical and mechanical technologies, wherein, the ball is present but the mouse movement is detected optically leading to more accuracy.
Laser Mouse
A laser mouse is the new generation mouse with two necessary components – light emitter and light detector. A laser mouse uses laser as the light emitter and has a precise scanning of mouse movement. You will find a laser mouse ranging anywhere between 1000-5700 dots-per-inch (DPI).
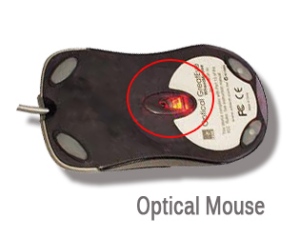
Optical Mouse
An optical mouse also has light emitter and light detector but it uses LED as the light emitter. It generally has lower DPI than laser mouse and users might find difficulty in using the device on black or shiny surfaces.
BlueTrack Mouse
The next generation mouse from Microsoft, it is based on the BlueTrack Technology that enables the mouse to track efficiently on any surface, be it a granite countertop or a carpet. The blue beam in mouse is a combination of image sensor and pixel geometry & is four times larger than the average laser beam used in laser mouse. It generates high-contrast pictures of the surface for an exceptional tracking accuracy.
Monitor
Desktop[edit]
A desktop monitor is typically provided with a stand from the manufacturer which lifts the monitor up to a more ergonomic viewing height. The stand may be attached to the monitor using a proprietary method or may use, or be adaptable to, a Video Electronics Standards Association, VESA, standard mount. Using a VESA standard mount allows the monitor to be used with an after-market stand once the original stand is removed. Stands may be fixed or offer a variety of features such as height adjustment, horizontal swivel, and landscape or portrait screen orientation.
VESA Mount[edit]
The Flat Display Mounting Interface (FDMI), also known as VESA Mounting Interface Standard (MIS) or colloquially as a VESA mount, is a family of standards defined by the Video Electronics Standards Association for mounting flat panel monitors, TVs, and other displays to stands or wall mounts.[14] It is implemented on most modern flat-panel monitors and TVs.
For Computer Monitors, the VESA Mount typically consists of four threaded holes on the rear of the display that will mate with an adapter bracket.
Rack Mount[edit]
Rack mount computer monitors are available in two styles and are intended to be mounted into a 19-inch rack:
- Fixed
A fixed rack mount monitor is mounted directly to the rack with the LCD visible at all times. The height of the unit is measured in rack units (RU) and 8U or 9U are most common to fit 17-inch or 19-inch LCD displays. The front sides of the unit are provided with flanges to mount to the rack, providing appropriately spaced holes or slots for the rack mounting screws. A 19-inch diagonal LCD is the largest size that will fit within the rails of a 19-inch rack. Larger LCDs may be accommodated but are 'mount-on-rack' and extend forward of the rack. There are smaller display units, typically used in broadcast environments, which fit multiple smaller LCD displays side by side into one rack mount.
- Stowable
A stowable rack mount monitor is 1U, 2U or 3U high and is mounted on rack slides allowing the display to be folded down and the unit slid into the rack for storage. The display is visible only when the display is pulled out of the rack and deployed. These units may include only a display or may be equipped with a keyboard creating a KVM (Keyboard Video Monitor). Most common are systems with a single LCD display but there are systems providing two or three displays in a single rack mount system.
Panel Mount[edit]
A panel mount computer monitor is intended for mounting into a flat surface with the front of the display unit protruding just slightly. They may also be mounted to the rear of the panel. A flange is provided around the LCD display, sides, top and bottom, to allow mounting. This contrasts with a rack mount display where the flanges are only on the sides. The flanges will be provided with holes for thru-bolts or may have studs welded to the rear surface to secure the unit in the hole in the panel. Often a gasket is provided to provide a water-tight seal to the panel and the front of the LCD will be sealed to the back of the front panel to prevent water and dirt contamination.
Open Frame[edit]
An open frame monitor provides the LCD monitor and enough supporting structure to hold associated electronics and to minimally support the LCD. Provision will be made for attaching the unit to some external structure for support and protection. Open frame LCD displays are intended to be built in to some other piece of equipment. An arcade video game would be a good example with the display mounted inside the cabinet. There is usually an open frame display inside all end-use displays with the end-use display simply providing an attractive protective enclosure. Some rack mount LCD display manufacturers will purchase desk-top displays, take them apart, and discard the outer plastic parts, keeping the inner open-frame LCD display for inclusion into their product.
Security Vulnerabilities[edit]
According to a recent NSA document leaked to Die Spiegel, the NSA sometimes swaps the monitor cables on targeted computers with a bugged monitor cable in order to allow the NSA to remotely see what's displayed on the targeted computer monitor.[15]
Van Eck phreaking is the process of remotely displaying the contents of a CRT or LCD display by detecting its electromagnetic emissions. It is named after Dutch computer researcher Wim van Eck, who in 1985 published the first paper on it, including proof of concept.[1] Phreaking is the process of exploiting telephone networks, used here because of its connection to eavesdropping.
Microprocessor
A few years ago, choosing a processor was pretty straightforward
AMD and Intel each offer the three categories of processors described in the following sections.
AMD actually packages two different processors under the Sempron name. A Socket A Sempron, also called a K7 Sempron, is in fact a re-badged Athlon XP processor. A Socket 754 Sempron, shown in Figure 5-1 is also called a K8 Sempron, and is really a cut-down Athlon 64 model running at a lower clock speed with a smaller L2 cache and a single-channel memory controller rather than the dual-channel memory controller of the Athlon 64. Early Sempron models had no support for 64-bit processing. Recent Sempron models include 64-bit support, although the practicality of running 64bit software on a Sempron is questionable. Still, like the Athlon 64, the Sempron also runs 32-bit software very efficiently, so you can think of the 64-bit support as future-proofing.
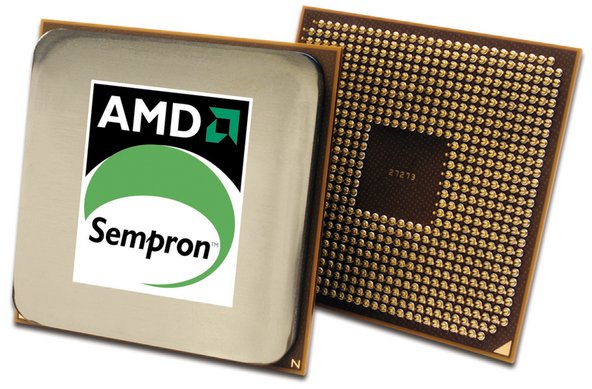 Figure 5-1: AMD Sempron processor (image courtesy of AMD, Inc.)
If you have a Socket 462 (A) or Socket 754 motherboard in your system, the Sempron offers an excellent upgrade path. You'll need to verify compatibility of your motherboard with the specific Sempron you intend to install, and you may need to upgrade the BIOS to recognize the Sempron.
For more information about Sempron processor models, visit http://www.amd.com/sempron.
That all changed when Intel introduced their Celeron D models, which are now available for Socket 478 and Socket 775 motherboards. While Celeron D models are still slower than Semprons dollar-for-dollar, the disparity is nowhere near as large as in years past. Celeron D processors, which sell in the $60 to $125 range, are very credible upgrade processors for anyone who owns a Socket 478 or Socket 775 motherboard. Like the Sempron, Celeron models are available with 64-bit support, although again the practicality of running 64-bit software on an entry-level processor is questionable. Once again, it's important to verify the compatibility of your motherboard with the specific Celeron you intend to install, and you may need to upgrade the BIOS to recognize the Celeron.
However, depending on your motherboard, a mainstream processor may not be an option even if you are willing to pay the extra cost. Mainstream processors consume considerably more power than most budget processors, often too much to be used on older motherboards. Also, mainstream processors often use more recent cores, larger L2 caches, and other features that may or may not be compatible with an older motherboard. An older power supply may not provide enough power for a current mainstream processor, and the new processor may require faster memory than is currently installed. If you intend to upgrade to a mainstream processor, carefully verify compatibility of the processor, motherboard, power supply, and memory before you buy the processor.
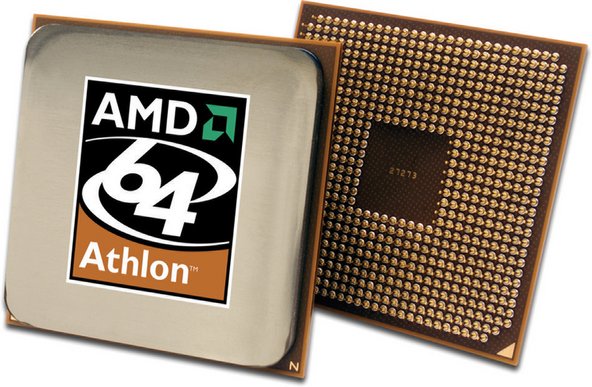 Figure 5-2: AMD Athlon 64 processor (image courtesy of AMD, Inc.)
Like the Sempron, the Athlon 64 has a memory controller built onto the processor die, rather than depending on a memory controller that's part of the chipset. The upside of this design decision is that Athlon 64 memory performance is excellent. The downside is that supporting a new type of memory, such as DDR2, requires a processor redesign. Socket 754 models have a single-channel PC3200 DDR-SDRAM memory controller versus the dual-channel controller in Socket 939 models, so Socket 939 models running at the same clock speed and with the same size L2 cache offer somewhat higher performance. For example, AMD designates a Socket 754 Newcastle-core Athlon 64 with 512 KB of L2 cache running at 2.2 GHz a 3200+ model, while the same processor in Socket 939 is designated an Athlon 64 3400+.
Older Pentium 4 models, which are available only in Socket 478, are identified by clock speed and sometimes a supplemental letter to indicate FSB speed and/or core type. For example, a Socket 478 Northwood-core Pentium 4 processor operating at a core speed of 2.8 GHz with the 400 MHz FSB is designated a Pentium 4/2.8. The same processor with the 533 MHz FSB is designated a Pentium 4/2.8B, and with the 800 MHz FSB it's designated a Pentium 4/2.8C. A 2.8 GHz Prescott-core Pentium 4 processor is designated a Pentium 4/2.8E.
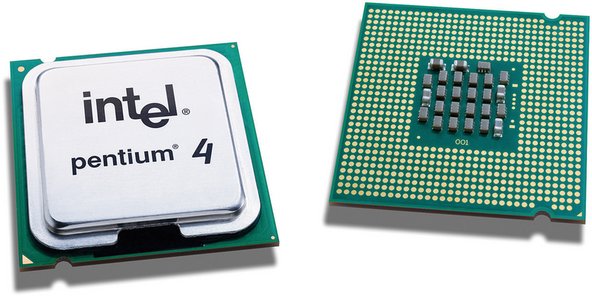 Figure 5-3: Intel Pentium 4 600 series processor (image courtesy of Intel Corporation)
Socket 775 Pentium 4 models belong to one of two series. All 500-series processors use the Prescott-core and have 1 MB of L2 cache. All 600-series processors use the Prescott 2M core and have 2 MB of L2 cache. Intel uses the second number of the model number to indicate relative clock speed. For example, a Pentium 4/530 has a clock speed of 3 GHz, as does a Pentium 4/630. The 540/640 models run at 3.2 GHz, the 550/650 models at 3.4 GHz, the 560/660 models at 3.6 GHz, and so on. A "J" following a 500-series model number (for example, 560J) indicates that the processor supports the XDB feature, but not EM64T 64-bit support. If a 500-series model number ends in 1 (for example, 571) that model supports both the XDB feature and EM64T 64-bit processing. All 600-series processors support both XDB and EM64T.
For more information about Pentium 4 processor models, visit http://www.intel.com/pentium4.
Combining two cores in one processor isn't exactly the same thing as doubling the speed of one processor. For one thing, there is overhead involved in managing the two cores that doesn't exist for a single processor. Also, in a single-tasking environment, a program thread runs no faster on a dual-core processor than it would on a single-core processor, so doubling the number of cores by no means doubles application performance. But in a multitasking environment, where many programs and their threads are competing for processor time, the availability of a second processor core means that one thread can run on one core while a second thread runs on the second core.
The upshot is that a dual-core processor typically provides 25% to 75% higher performance than a similar single-core processor if you multitask heavily. Dual-core performance for a single application is essentially unchanged unless the application is designed to support threading, which many processor-intensive applications are. (For example, a web browser uses threading to keep the user interface responsive even when it's performing a network operation.) Even if you were running only unthreaded applications, though, you'd see some performance benefit from a dual-core processor. This is true because an operating system, such as Windows XP, that supports dual-core processors automatically allocates different processes to each core.
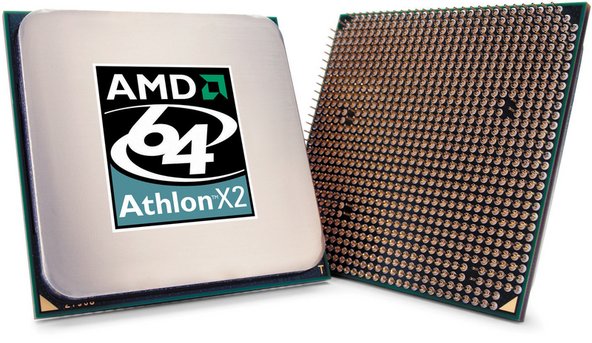 Figure 5-4: AMD Athlon 64 X2 processor (image courtesy of AMD, Inc.)
For more information about Athlon 64 X2 processor models, visit http://www.amd.com/athlon64.
The 800-series 90 nm Smithfield-core Pentium D, shown in Figure 5-5, is a stop-gap kludge for Intel, designed to counter the AMD Athlon 64 X2 until Intel can bring to market its real answer, the dual-core 65 nm Presler-core processor, which is likely to be designated the 900-series Pentium D. The Presler-based dual-core processors will be fully integrated, compatible with existing dual-core Intel-compatible motherboards, and feature reduced power consumption, lower heat output, twice as much L2 cache, and considerably higher performance.
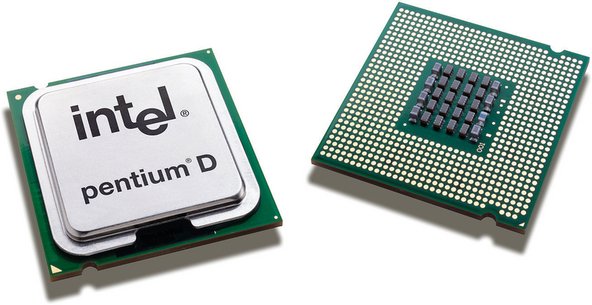 Figure 5-5: Intel Pentium D dual-core processor (image courtesy of Intel Corporation)
Reading the foregoing, you might think we had only contempt for the 800-series Pentium D processors. In fact, nothing could be further from the truth. They're a kludge, yes, but they're a reasonably cheap, very effective kludge, assuming that you have a motherboard that supports them. We extensively tested an early sample of the least expensive 800-series Pentium D, the 820. The 820 runs at 2.8 GHz, and under light, mostly single-tasking use, the 820 "feels" pretty much like a 2.8 GHz Prescott-core Pentium 4. As we added more and more processes, the difference became clear. Instead of bogging down, as the single-core Prescott would have done, the Pentium D provided snappy response to the foreground process.
For more information about Pentium D processor models, visit http://www.intel.com/products/processor/....
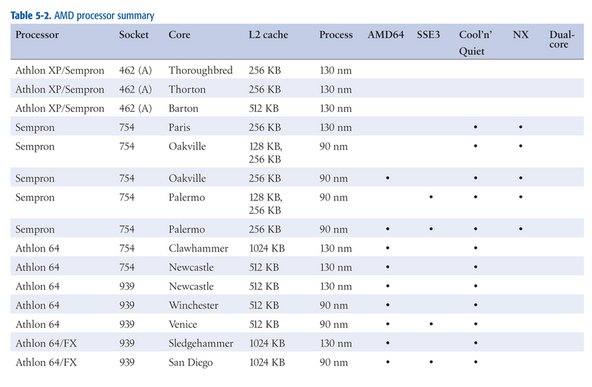 Table 5-2: Table 5-2. AMD processor summary
Table 5-3 lists the important characteristics of current Intel processors, including the special features they support.
 Table 5-3: Intel processor summary
OEM Versus Retail-BoxedNowadays, choosing a processor isn't as simple. AMD and Intel now make literally scores of different processor models. Each company now offers several lines of processors, which differ in clock speed, L2 cache, socket type, host-bus speed, special features supported, and other characteristics
To further confuse matters, most AMD and Intel processors are available in two types of packaging, called OEM and retail-boxed. OEM processor packages include only the bare processor and usually provide only a 90-day warranty. Retail-boxed processors include the processor, a compatible CPU cooler, and a longer warranty, typically three years.
A retail-boxed processor is usually the better deal. It typically costs only a few dollars more than the OEM version of the same processor, and the bundled CPU cooler is usually worth more than the price difference. But if you plan to install an after-market CPU cooler for example, because you are upgrading your system to be as quiet as possible it may make sense to buy the OEM processor.
AMD and Intel each offer the three categories of processors described in the following sections.
Budget processors 
Budget processors give up a bit of performance in exchange for a lower price. At any given time, AMD or Intel's fastest available budget processor is likely to have about 85% of the performance of their slowest mainstream model. Budget processors are more than sufficient for routine computing tasks. (After all, today's budget processor was yesterday's mainstream processor and last week's performance processor.) Budget processors are often the best choice for a system upgrade, because their lower clock speeds and power consumption make it more likely that they'll be compatible with an older motherboard.AMD Sempron 
The various models of the AMD Sempron processor sell in the $50 to $125 range, and are targeted at the budget through low-end mainstream segment. The Sempron replaced the discontinued Socket A Duron processor in 2004, and the obsolescent Socket A Athlon XP processor in 2005. Various Sempron models are available in the obsolescent Socket A and in the same Socket 754 used by some Athlon 64 models.AMD actually packages two different processors under the Sempron name. A Socket A Sempron, also called a K7 Sempron, is in fact a re-badged Athlon XP processor. A Socket 754 Sempron, shown in Figure 5-1 is also called a K8 Sempron, and is really a cut-down Athlon 64 model running at a lower clock speed with a smaller L2 cache and a single-channel memory controller rather than the dual-channel memory controller of the Athlon 64. Early Sempron models had no support for 64-bit processing. Recent Sempron models include 64-bit support, although the practicality of running 64bit software on a Sempron is questionable. Still, like the Athlon 64, the Sempron also runs 32-bit software very efficiently, so you can think of the 64-bit support as future-proofing.
 Figure 5-1: AMD Sempron processor (image courtesy of AMD, Inc.)
For more information about Sempron processor models, visit http://www.amd.com/sempron.
Intel Celeron 
For many years, the Intel Celeron processor was the poor stepsister, offering too little performance at too high a price. Cynical observers believed that the only reason Intel sold any Celeron processors at all was that system makers wanted the Intel name on their boxes without having to pay the higher price for an Intel mainstream processor.That all changed when Intel introduced their Celeron D models, which are now available for Socket 478 and Socket 775 motherboards. While Celeron D models are still slower than Semprons dollar-for-dollar, the disparity is nowhere near as large as in years past. Celeron D processors, which sell in the $60 to $125 range, are very credible upgrade processors for anyone who owns a Socket 478 or Socket 775 motherboard. Like the Sempron, Celeron models are available with 64-bit support, although again the practicality of running 64-bit software on an entry-level processor is questionable. Once again, it's important to verify the compatibility of your motherboard with the specific Celeron you intend to install, and you may need to upgrade the BIOS to recognize the Celeron.
AVOID NON-D CELERON PROCESSORSFor more information about Celeron processor models, visit http://www.intel.com/celeron.
Celeron processors (without the "D") are based on the Northwood core and have only 128 KB of L2 cache. These processors have very poor performance, and unfortunately remain available for sale. The Celeron D models are based on the Prescott-core, and have 256 KB of L2 cache.
Mainstream processors 
Mainstream processors typically cost $125 to $250 although the fastest models sell for $500 or more and offer anything up to about twice the overall performance of the slowest budget processors. A mainstream processor may be a good upgrade choice if you need more performance than a budget processor offers and are willing to pay the additional cost.However, depending on your motherboard, a mainstream processor may not be an option even if you are willing to pay the extra cost. Mainstream processors consume considerably more power than most budget processors, often too much to be used on older motherboards. Also, mainstream processors often use more recent cores, larger L2 caches, and other features that may or may not be compatible with an older motherboard. An older power supply may not provide enough power for a current mainstream processor, and the new processor may require faster memory than is currently installed. If you intend to upgrade to a mainstream processor, carefully verify compatibility of the processor, motherboard, power supply, and memory before you buy the processor.
AMD Athlon 64 
The AMD Athlon 64 processor, shown in Figure 5-2, is available in Socket 754 and Socket 939 variants. As its name indicates, the Athlon 64 supports 64-bit software, although only a tiny percentage of Athlon 64 owners run 64-bit software. Fortunately, the Athlon 64 is equally at home running the 32-bit operating systems and applications software that most of us use. Figure 5-2: AMD Athlon 64 processor (image courtesy of AMD, Inc.)
NUMBERS LIEFor more information about Athlon 64 processor models, visit http://www.amd.com/athlon64.
The model numbers of Athlon 64 and Sempron processors are scaled differently. For example, the Socket 754 Sempron 3100+ runs at 1800 MHz and has 256 KB of cache, and the Socket 754 Athlon 64 2800+ runs at the same clock speed and has twice as much cache. Despite the lower model number, the Athlon 64 2800+ is somewhat faster than the Sempron 3100+. Although AMD hotly denies it, most industry observers believe that AMD intends Athlon 64 model numbers to be compared with Pentium 4 clock speeds and Sempron model numbers with Celeron clock speeds. Of course, Intel also designates their recent processors by model number rather than clock speed, confusing matters even further.
Intel Pentium 4 
The Pentium 4, shown in Figure 5-3, is Intel's flagship processor, and is available in Socket 478 and Socket 775. Unlike AMD which sometimes uses the same Athlon 64 model number to designate four or more different processors with different clock speeds, L2 cache sizes, and sockets Intel uses a numbering scheme that identifies each model unambiguously.Older Pentium 4 models, which are available only in Socket 478, are identified by clock speed and sometimes a supplemental letter to indicate FSB speed and/or core type. For example, a Socket 478 Northwood-core Pentium 4 processor operating at a core speed of 2.8 GHz with the 400 MHz FSB is designated a Pentium 4/2.8. The same processor with the 533 MHz FSB is designated a Pentium 4/2.8B, and with the 800 MHz FSB it's designated a Pentium 4/2.8C. A 2.8 GHz Prescott-core Pentium 4 processor is designated a Pentium 4/2.8E.
 Figure 5-3: Intel Pentium 4 600 series processor (image courtesy of Intel Corporation)
For more information about Pentium 4 processor models, visit http://www.intel.com/pentium4.
Extreme Processors
We classify the fastest, most expensive mainstream processors those that sell in the $400 to $500 range as performance processors, but AMD and Intel reserve that category for their top-of-the-line models, which sell for $800 to $1,200. These processors the AMD Athlon 64 FX, the Intel Pentium 4 Extreme Edition, and the Intel Pentium Extreme Edition are targeted at the gaming and enthusiast market, and offer at best marginally faster performance than the fastest mainstream models.
In fact, the performance bump is generally so small that we think anyone who buys one of these processors has more dollars than sense. If you're considering buying one of these outrageously expensive processors, do yourself a favor. Buy a $400 or $500 high-end mainstream processor instead, and use part of the extra money for more memory, a better video card, a better display, better speakers, or some other component that will actually provide a noticeable benefit. Either that, or keep the extra money in the bank.
Dual-core processors 
By early 2005, AMD and Intel had both pushed their processor cores to about the fastest possible speeds, and it had become clear that the only practical way to increase processor performance significantly was to use two processors. Although it's possible to build systems with two physical processors, doing that introduces many complexities, not least a doubling of the already-high power consumption and heat production. AMD, later followed by Intel, chose to go dual-core.Combining two cores in one processor isn't exactly the same thing as doubling the speed of one processor. For one thing, there is overhead involved in managing the two cores that doesn't exist for a single processor. Also, in a single-tasking environment, a program thread runs no faster on a dual-core processor than it would on a single-core processor, so doubling the number of cores by no means doubles application performance. But in a multitasking environment, where many programs and their threads are competing for processor time, the availability of a second processor core means that one thread can run on one core while a second thread runs on the second core.
The upshot is that a dual-core processor typically provides 25% to 75% higher performance than a similar single-core processor if you multitask heavily. Dual-core performance for a single application is essentially unchanged unless the application is designed to support threading, which many processor-intensive applications are. (For example, a web browser uses threading to keep the user interface responsive even when it's performing a network operation.) Even if you were running only unthreaded applications, though, you'd see some performance benefit from a dual-core processor. This is true because an operating system, such as Windows XP, that supports dual-core processors automatically allocates different processes to each core.
AMD Athlon 64 X2 
The AMD Athlon 64 X2, shown in Figure 5-4, has several things going for it, including high performance, relatively low power requirements and heat production, and compatibility with most existing Socket 939 motherboards. Alas, while Intel has priced its least expensive dual-core processors in the sub-$250 range, the least expensive AMD dual-core models initially sold in the $800 range, which is out of the question for most upgraders. Fortunately, by late 2005 AMD had begun to ship more reasonably priced dual-core models, although availability is limited. Figure 5-4: AMD Athlon 64 X2 processor (image courtesy of AMD, Inc.)
Intel Pentium D 
The announcement of AMD's Athlon 64 X2 dual-core processor caught Intel unprepared. Under the gun, Intel took a cruder approach to making a dual-core processor. Rather than build an integrated dual-core processor as AMD had with its Athlon 64 X2 processors, Intel essentially slapped two slower Pentium 4 cores on one substrate and called it the Pentium D dual-core processor.The 800-series 90 nm Smithfield-core Pentium D, shown in Figure 5-5, is a stop-gap kludge for Intel, designed to counter the AMD Athlon 64 X2 until Intel can bring to market its real answer, the dual-core 65 nm Presler-core processor, which is likely to be designated the 900-series Pentium D. The Presler-based dual-core processors will be fully integrated, compatible with existing dual-core Intel-compatible motherboards, and feature reduced power consumption, lower heat output, twice as much L2 cache, and considerably higher performance.
 Figure 5-5: Intel Pentium D dual-core processor (image courtesy of Intel Corporation)
For more information about Pentium D processor models, visit http://www.intel.com/products/processor/....
AMD and Intel processor summaries 
Table 5-2 lists the important characteristics of current AMD processors, including the special features they support. Table 5-2: Table 5-2. AMD processor summary
 Table 5-3: Intel processor summary
SPECIAL FEATURES
Special features are not always implemented across an entire line of processors. For example, we list the Pentium D 8XX-series processors as supporting EM64T, SSE3, EIST, and dual core. At the time we wrote this, three Pentium D 8XX models were available: the 2.8 GHz 820, the 3.0 GHz 830, and the 3.2 GHz 840. The 830 and 840 models support all of the special features listed. The 820 model supports EM64T, SSE3, and dual-core operation, but not EIST. If a special feature listed as being supported by a particular line of processors is important to you, verify that it is supported in the exact processor model you intend to buy.
Tuesday, January 28, 2014
Expansion Card
Computer Assembling
Tuesday, January 28, 2014
Expansion Cards
Expansion card
Alternatively referred to as an add-on card, expansion board, internal card, interface adapter, or just card. An expansion card is an electronic board or card added into theexpansion slot of a desktop computer or other non-portable computer to give that computer a new ability, such as the ability to connect to another computer using a network cable.
Types of expansion cards in a computer
- Interface card (ATA, Bluetooth, EIDE, Firewire, IDE, Parallel, RAID, SCSI, Serial, and USB)
- Modem
- MPEG Decoder
- Network Card
- Sound Card
- Video Card
- Video capture card
Expansion card example
Below is a graphic illustration of an ISA SCSI card. As can be seen by the below illustration, this adapter would enable users to connect Internal and external SCSI drives into their computers.

As can be seen by the above illustration, expansion cards are keyed, which means they will only go in one direction, and only into the expansion slot the card was designed for. On the backs of every expansion cards is also a back slot that allows computer components to plug into the card and interface with the computer.
Related pages
- How do I install an expansion card?
- How do I remove an expansion card in my computer?
- How do I open my computer case?
Also see: Adapter, Expansion slot cover, Expansion, Expansion slot, Hardware definitions, PC Card,Rese
Hardware
Getting the computer case ready

Lay a soft cloth on a table big enough to accommodate the case, monitor, keyboard and speakers. Make sure that power supply can be reached. Remove case from packing box, making sure not to scratch case or destroy packing that will be recycled in shipping. Keep all packing materials back in the packing box. Place case on table. Unscrew the screws at the back of case and remove left and right side panels. Remove one dvd cover from the front panel. In some cases you may have to remove the front panel by pulling under the bottom of the front panel.
Remove the instruction manual if any and extra screws packet from the case. Place the manual in a manila folder. Do the same for all paperwork that comes with all components. The contents of this folder will be sent with the computer to the customer at delivery. Keep the extra screws packet handy for use. When it comes to which screws to use where, because the different screw sizes look very much alike, use the size that fits best! Tip - generally the hard drive screws are a bigger size. The PSU screws are also the same size but sometimes have a bigger head.The DVD screws are smaller. Motherboard screws may be the same as the hard drive or DVD.
Install power supply unit (PSU)

MAKE SURE VOLTAGE SWITCH ON PSU IS SET TO RIGHT VOLTAGE FOR YOUR COUNTRY! Stand the case. Position power supply unit in its place in the case rear with the power socket facing outside and its fan side placed appropriately based on case design. Fasten 4 screws that came with case through rear of case into PSU to hold PSU in place. Tighten all screws in the assembly with fingertips force only on the screwdriver to avoid over tightening and potential damage.

Install hard disk drive (HDD)
You may prefer to use plastic holders to secure your hard drive, a screwless design offered in some cases, but I feel screws give you a better hold. Insert the hard drive into one of the 3.5 inch internal bays for hard drives in the case, making sure the label side of the drive faces up, and the hard drive connectors face into the case. Push in the hard drive so the screw holes on each side of the hard drive line up with the holes on the drive bay of the case, and the hard drive rests on the small ledges inside the drive bay. Fasten 4 screws to these holes, 2 on each side, to secure the hard drive to the drive bay.
Install DVD drive, and memory card reader (optional)

Remove from the front panel of the case the plastic holders from the external 3.5 inch drive bay (if installing a card reader), and also from the top external 5.25 inch drive bay for the DVD drive. Remove any steel grills from the entrance of these bays on the case so you can slide the drives in. Snap back the front panel onto the case. Slide the Card Reader into the external 3.5 inch drive bay, from the front of the case. Slide it in so it is level with the front panel. Fasten with screws on each side.
Slide DVD drive into top external 5.25 inch drive bay, from the front of the case. Slide in so it is level with the front panel. Fasten with 8 screws, 4 on each side.
Install motherboard
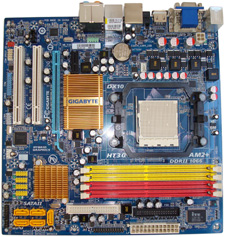
DO NOT SCRATCH MOTHERBOARD TO AVOID POTENTIAL DAMAGE TO ETCHINGS ON MOTHERBOARD
Lay case on its side with open side facing up, back of case (input/outputs) closest to you. Drape all long wires including PSU wires outside case, making sure not to scratch case. Install the metal input output shield that came with the motherboard with the three vertical round holes on the shield to your right when facing the case. Install new shield by snapping along edges till small points take hold.
Screw 6 motherboard hexagon stud screws, that came with the case, into the case. Some motherboards may take more screws, check your motherboard first. Use the 6 holes that are marked on the case for the micro ATX case size that match the holes on your motherboard . Tighten with a motherboard hexagon tool or similar tool. Test which size screw that came with the case to use into the hexagon studs before placing motherboard on the studs. It's hard to get out the wrong sized screw if the motherboard is in place. Place motherboard on top of the studs. Fasten 6 of those screws through the motherboard into the studs to fasten motherboard. Use a Phillips head screwdriver that sticks to the screws so the screws do not fall on the motherboard. Again, careful that the screwdriver or screws do not scratch motherboard. Tighten screws with fingertip force only to avoid damage. Also, remember at some point in the future you may want another motherboard and you don't want a nightmare unscrewing overly tightened screws.
Install processor (CPU), CPU heat sink and CPU fan
Follow any installation instructions that came with cpu. They are usually as follows. Handle CPU with care touch only by the sides! Don't touch the socket! Lift CPU lever, align gold triangle on cpu with right angle drawn on the motherboard at one corner of the cpu socket, aligning the two notches on the cpu sides with the cpu socket, place cpu in socket and lock CPU lever.
Follow any installation instructions that came with cpu heat sink and cpu fan. They are usually as follows. Place heat sink and CPU fan on CPU making sure CPU fan wire is on the side with easy access to the CPU fan header on motherboard. Make sure thermal paste material on heat sink is not wiped off by placing on another surface. Connect the heat sink connectors to the motherboard per instructions from the cpu manual, usually it's just push in the connectors to lock it to the motherboard. Connect CPU fan to CPU fan header on motherboard.

Install memory
Insert memory sticks in the dual channel memory slots. Make sure the notch on the memory sticks match the notch in the DIMM slots before inserting them. Make sure you insert them all the way into the DIMM slot. This usually causes the clasps on the top corners of the slots to click in and lock the memory sticks in place. If this doesn't happen make sure the memory sticks are all the way into the slots and then manually lock in the clasps.
Clear CMOS
Clear CMOS memory with the CMOS header. Refer motherboard manual for motherboard diagram to find all jumpers, headers, other connectors locations on motherboard and these instructions.
Connect power to motherboard
Plug in 20 + 4 pin main power connector from the PSU to the main power slot on motherboard. The pins shapes match the pin sockets and can only be inserted one way. The clasp on the connector will direct you.
Connect power to CPU
Plug in 4 pin CPU power connector from the PSU to the CPU power slot on motherboard. Make sure to connect by matching pin shapes on connector to pin sockets on motherboard. The clasp on the connector will direct you. If you use a more powerful PSU this CPU power connector will have 8 pins, no problem just connect 4 of the pins, again the shape of the pins and the clasp will direct you which 4 pins to use and the direction it plugs in.
Connect case wires to motherboard
Connect case wires: power switch/reset switch/power led/hdd led/speaker pins (if case has a case speaker) to front panel header on motherboard. Refer motherboard manual for pin orientation. A small triangle on the side of a pin means positive.
Use plastic ties provided with the case to tie these wires to the case, if needed, to reduce motherboard wire clutter and increase airflow.
Connect case front panel USB 3 to motherboard
Connect case front panel USB 3 cable from case to a USB 3 header on motherboard. If your case has only a front panel USB 2 jack connect to a USB 2 header.
Connect case front panel HD audio to motherboard
Connect case front panel HD audio cable from case to front panel audio header on motherboard.
Connect memory card reader USB cable to motherboard
If using a memory card reader connect the card reader USB cable to another USB header on motherboard.
Connect case fan to motherboard
Connect case fan to case header on motherboard. Remove the molex adapter (if any) it is not required.
Connect power to HDD and DVD
Connect a power rail with SATA connectors from PSU to HDD. Connect the other power rail with the SATA connectors from PSU to DVD.
Connect SATA cables from motherboard to HDD and DVD
Connect SATA cable that came with the motherboard from motherboard SATA3 header to HDD. Use straight shaped SATA connector on HDD side. Connect SATA cable that came with the motherboard from motherboard SATA3 header to DVD. Use L shaped SATA connector on DVD side.
Install video card

Adding this section for the CurrentBuild Dream PC which uses a separate video card. Remove from the case's rear the metal bracket corresponding to the motherboard's PCI express x16 slot, by unscrewing it. Insert the video card into this PCI express x16 slot, making sure again you don't scratch the motherboard with the video card's metal bracket or other part. Screw the video card's metal bracket to the case rear to fasten it.
If the video card has a power connector, connect from the PSU a six pin PCI express power connector to this video card power connector.
Tie wires
Tie PSU rails and other wires around the inside periphery of the case as much as possible to keep motherboard uncluttered. Tuck extra rails and connectors into empty external 5.25 and 3.5 inch drive bays. Use ties as appropriate.
Place CurrentBuild Sense PC logo label on case
Place CurrentBuild Sense label sticker at center and top of front panel.
Plug in power supply cord
Plug PSU cord into PSU and wall outlet and start computer. Use usual precautions when handling electricity!
Test connections
Test to see the following are running - all 3 fans (case, CPU, PSU), power button, reset button, speaker beep (if case has a speaker), PLED light, HDD led light, DVD led light.
Screw back case left and right panel
Screw back left and right panel with thumb screws.
More testing
To test CPU/memory/motherboard/hard drive/DVD/PSU/case/keyboard/mouse/audio - connect the monitor, keyboard, mouse, internet jack and speakers to the computer and install the operating system.
Install Linux or Windows 8.1 operating system (OS)

Enter BIOS by tapping the delete key immediately on starting the computer. Update the date and time. Under Storage configuration or other similar heading make sure SATA Type is set to 'AHCI'. This setting is for Linux, Windows 8.1, 8, 7 and Vista. This is the default setting nowadays - 'AHCI'. For Windows XP set SATA Type to 'IDE'.
Under Boot options make First Boot Device 'DVD RW' or your DVD option, and Second Boot Device 'Hard Drive' or your hard drive option.
Under chipset configuration or other similar heading make Primary Graphics Adapter - 'Onboard', unless you are installing a separate video card in which case it should be PCI Express.
Make other changes to BIOS as desired. Look through each menu and change as desired. Save settings and exit BIOS.
Install Linux or Windows 8.1 with an installation DVD from the DVD drive. For Windows you have to buy the installation DVD. For Linux, download the Linux distribution you want to install onto another computer and then burn that iso image file to a DVD to create your free Linux installation DVD. Just follow the directions once the installation DVD loads on your newly assembled PC to install the operating system. For Windows place Certificate of Authentication sticker on case rear. After installation of the OS is complete remove the DVD from the DVD drive, enter BIOS and change the boot order back to 'Hard Disk' first and 'Disabled' second. Restart PC!
Update BIOS
Update the BIOS from the flash utility in the BIOS itself. The new BIOS will reset all changes in the BIOS back to default settings, so make changes again in the BIOS as desired.
For Linux - Updates
Use Update Manager or equivalent to download and install all improvements, security fixes and software patches for the OS and the software packages or apps that come pre-installed with the OS.
For Linux Mint 13, which is the LTS version (long term support release) you can backport or update improvements from newer releases by following these instructions from the Linux Mint website. To add the backports in Linux Mint 13, follow the steps below:
- Open the “Software Sources” tool from “Menu -> Preferences -> Software Sources”
- Click on the “Backported packages (backports)” checkbox
For Windows 8.1 - Create a drivers folder
Create a new folder called CurrentBuild on the hard drive. Under CurrentBuild create a separate sub folder for each driver and utility to be installed. Copy the latest separately downloaded or otherwise provided driver or utility installation file to its respective sub folder. Double click on each installation file in each sub folder to extract files and start installing in the order below.
For Windows 8.1 - Install drivers
Install latest motherboard chipset drivers downloaded separately from motherboard website.
Install VGA Driver downloaded separately from the motherboard website. Do a custom install so you remove any marketing/promotional software if not wanted.
Install latest HD audio driver downloaded separately from motherboard website.
Install latest LAN driver downloaded separately from motherboard website. Connect RJ45 cable from your DSL or cable modem to the RJ45 jack in the computer back panel. LAN should now be working and the computer connected to the Internet.
For Windows 8.1 - Install antivirus software and utilities
Install antivirus program from motherboard CD and update it from antivirus program's website, or download and install free Microsoft Security Essentials, Microsoft's free antivirus and anti spyware package.
Install CPUZ utility downloaded from CPUZ website and check CPU and memory performance.
For Windows 8.1 - Updates
Use Windows Update to download and install all security fixes and software patches for the OS.
Install monitor driver for your monitor if Windows update does not install it for you, and also keyboard and mouse drivers if needed for certain keyboards and mice.
For Windows 8.1 - Install software programs
Download and install latest version of Firefox, Adobe Reader, Adobe Flash Player and Java from respective websites.
Even more testing
Play audio CD to test. Insert memory card into memory card reader to test if installed. Insert flash drive or other USB device into USB port(s) to test. Let system run for 12 hrs. Wipe down and clean case with moist cloth.
Pack
Place case in plastic bag and encase corners with foam packing recycled from original packing. Then place in original box and seal.
Monday, January 27, 2014
Subscribe to: Posts (Atom)
Subscribe to:
Comments (Atom)


